Introduction
Welcome! This guide will help users get started with the
riskassessment application for the first time. For more
information about how to deploy the application, please reference the Deployment guide. And note:
this guide assumes you have already downloaded the
riskassessment package & all of it’s dependencies
following the installation
instructions.
Run / Deploy app.R
If your application is already deployed, you can skip this step!
After you have installed the
riskassessment package, you are now able to run the app
locally using the provided
app.R file. If applicable, you can specify application
options in this file, using either options() or arguments
of the run_app() function (run
?riskassessment::run_app to learn more). However, for the
purposes of this guide, we’ll run the function as-is, accepting all
defaults:
# launch the application
riskassessment::run_app()
Running this code will launch the application and if it doesn’t already exist, it will create an initial database for authentication.
First time log in
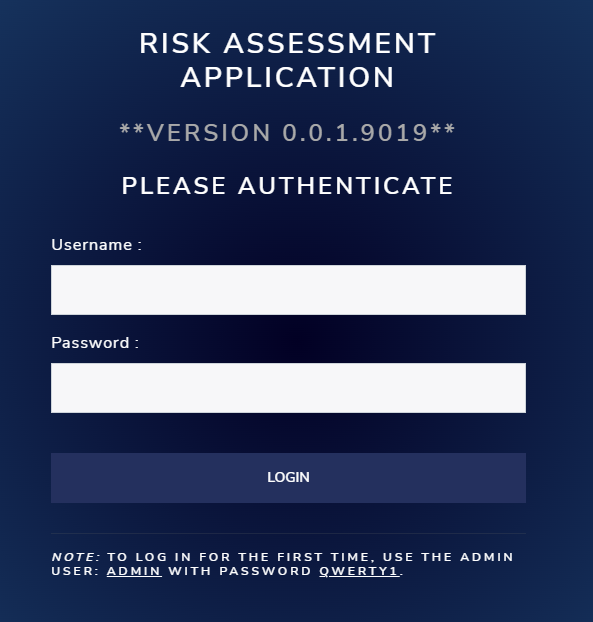
The first page you’ll see is an authentication screen with a default
note on the bottom: NOTE: TO LOG IN FOR THE FIRST TIME, USE THE
ADMIN USER: ADMIN WITH PASSWORD QWERTY1. If you
recall, the application acts as a central hub for an organization to
review and assess the risk of R packages, thus establishing users with
specific roles is vital. To start, the application needs an
admin user.
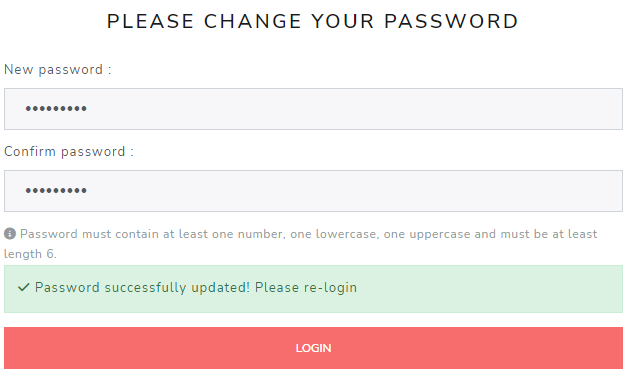
This admin user will be asked to change their password
immediately. After supplying a new secure password, click “UPDATE NEW
PASSWORD”. When the password was successfully updated, you’ll be
prompted to “LOGIN” again with your new credentials.
Subsequent logins
The designated admin user(s) will have special
privileges and duties in the application, including but not limited to
creating new users, with both admin and non-admin roles.
For admins, please see the article titled “Credential Manager” on
how to create these new users. For non-admin roles, you will receive a
temporary password for your initial log in, which you’ll be prompted to
change with immediately upon your first visit to the app. For subsequent
visits, you won’t have to worry about all these first-time log in
procedures!
Welcome to the app!
Upon successful log in, you’ll notice many tabs and panels.

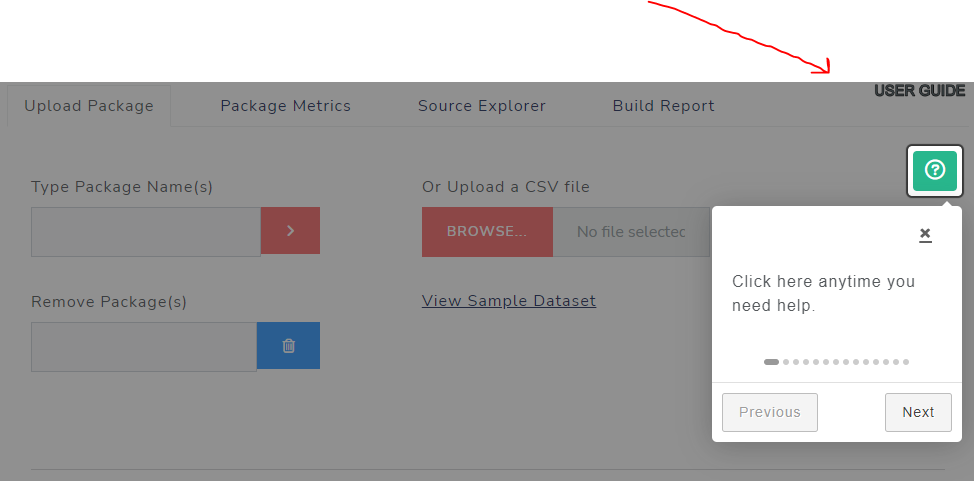
Self-guided tours
Throughout the app, there are small help buttons strategically placed in the upper right-hand corners of each page. When clicked, they empower users to walk through all the UI elements visible on-screen at their desired pace. Consider it your personal tour guide when you need a quick reminder on “what does what?”.

Upload a package
Now to the main event - let’s upload some packages to review &
assess for our organization. If it’s your first time using the app, an
empty database will be initialized on app launch to be populated with
packages, their riskmetric outputs, and your organization’s
assessment preferences. To begin filling the database with package info,
we’ll need to start by upload a list of packages we want to review.
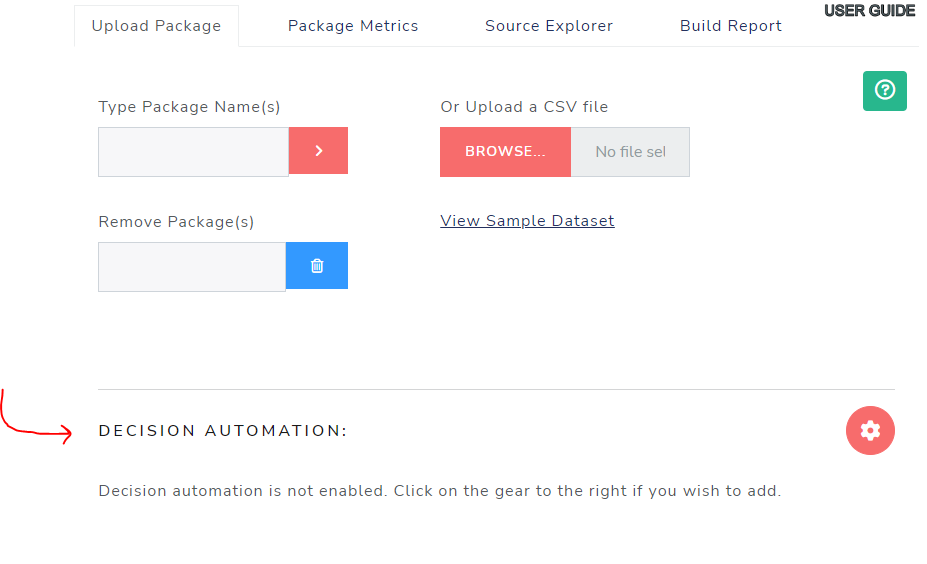
Under the Risk Assessment tab, the main panel is titled,
R PACKAGE RISK ASSESSMENT APP with four tabs under it. By
default, you’ll be directed to the Upload Package tab.
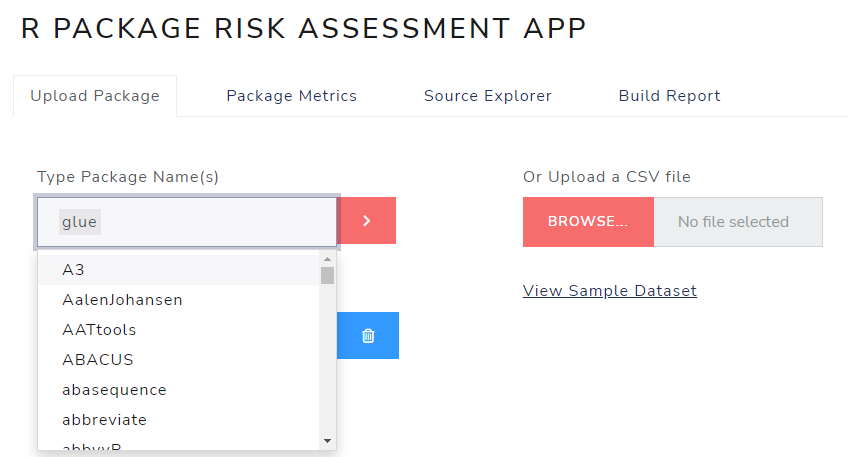
Uploading packages can be done by manually typing one (or more)
package names into the prompt or, if you have a long list of packages to
asses, it may be more convenient to upload a CSV file of the package
names. The CSV file requires two columns: “package” and “version.”
However, right now riskmetric can only tackle the current
version, so the version column is ignored. In the meantime, you can make
your life easier by setting version to “0.0.0” for all of your packages
in the CSV. Additionally, a third column “decision” can be included.
This can be helpful if your organization already has a list of packages
approved for use.
A over simplified example of an acceptable CSV file:
package,version
stringr,0.0.0
tidyr,0.0.0
Alternatively, you may prefer to test the app by typing in a package, such as “glue” into the prompt. Notice that the text input will pre-populate itself with all CRAN packages upon click, thus if you forget the spelling or case of the package, the auto-complete feature can assist your. When ready, select the red “>” button
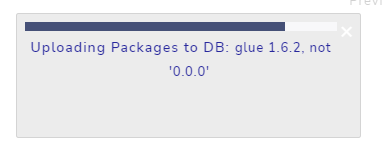
A progress modal like the one below will appear indicating the process of generating package info from various sources has begun and the app will start inserting this information into the database.
Upon completion, a “Summary of Uploaded Packages” section will display. This lists the total packages uploaded, the number of packages that were new to the database, the number of undiscovered (probably misspelled) packages, and the number of duplicate packages, i.e. packages that already existed in the database.

Decision Automation
If your organization has black and white rules about package risk
decisions based solely on riskmetric scores, then decision
automation is for you. When leveraged, it will help you automatically
classify packages into the “Low”, “Medium”, or “High” risk decision
categories upon upload. This automation saves your review team time and
mental capacity when reviewing large groups of packages. The current
automation rules are always displayed on the ‘Upload Package’ tab.
Please note that only admin users have the necessary
privileges to edit. To get started, click on the small gear button in
the upper left hand corner
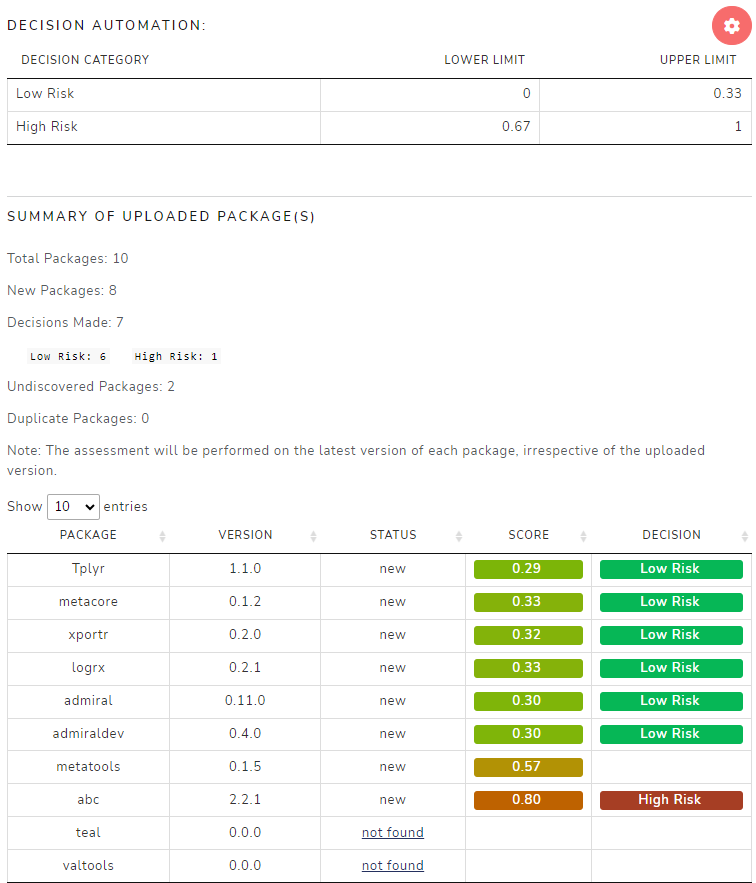
In a fictitious example below, let’s say an admin user
adopts automated decision rules for packages with risk scores less than
0.33 and greater than .66. Perhaps this organization has a policy that
mandates any package whose risk score falls between 0.33 and 0.66 will
need to be reviewed manually. After uploading a new CSV of packages, you
can see the ‘Summary of Uploaded Package(s)’ displays the number of
decisions made overall and by each risk category. Here, you can see that
10 packages were uploaded, and 5 automatic decisions were made: four
received the “low” designation and one was labeled as “high” risk. In
the summary table, the decisions are displayed with their respective
risk scores on the right-hand side. You can also observe that a few
packages weren’t found because they don’t exist on CRAN.
Sidebar
Now that the database has been populated with package data, direct
your attention to the PACKAGE CONTROL PANEL at left and
select a package (such as glue) from the list. Once a
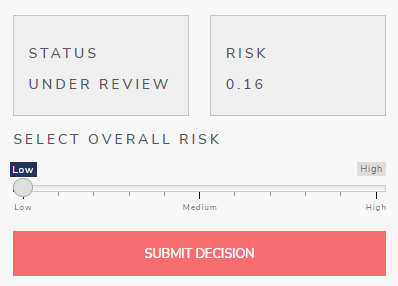
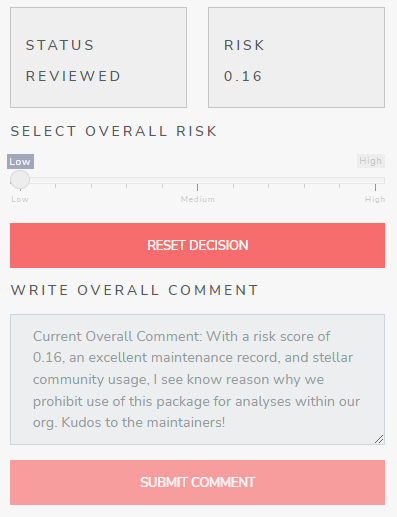
package is selected, the VERSION, STATUS and
RISK boxes are populated with information. For now, the
latest version of the package is displayed. Since a decision to endorse
or reject the package hasn’t been made yet, the STATUS is
“Under Review”. Third, the RISK box contains the
riskmetric score, represented as a number between 0 (low
risk) and 1 (high risk).
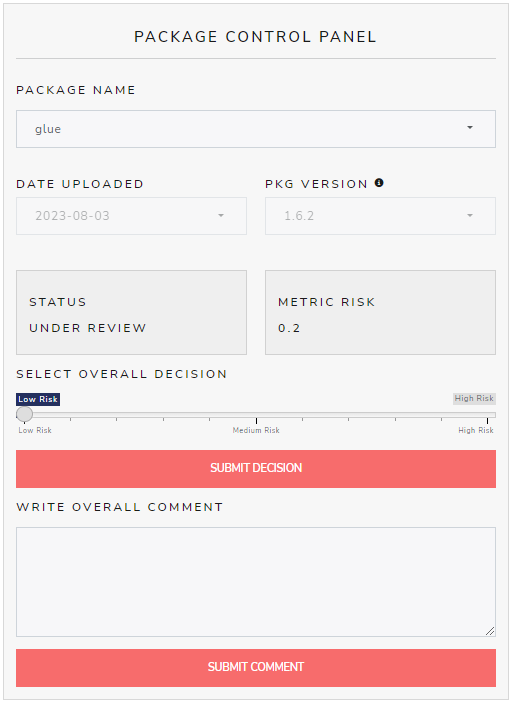
There are also two submission buttons above:
SUBMIT DECISION and SUBMIT OVERALL COMMENT.
The goal is that after a thorough review of other info contain in the
application, the user would be well informed enough to categorize the
package’s risk as either “low”, “medium”, or “high” risk using the
slider. Clicking submit here completes the review of this package for
the organization and can only be undone by an admin user.
If you’re looking submit something less formal, before submitting a
decision, consider submitting an “overall comment” summarizing your high
level thoughts on the package. Though it’s not required, it’s
recommended to always submit an “overall comment” when submitting a
final decision.
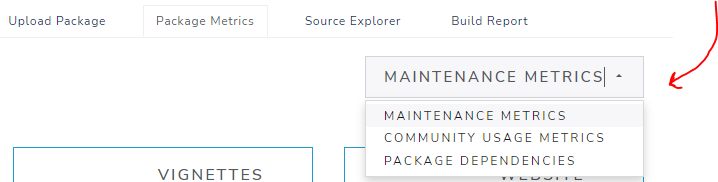
‘Package Metrics’ Review Tabs
The Package Metrics tab contains all the
riskmetric derived assessments in one place, and
consolidates them into different like-kind groups for convenience-sake.
That is, metrics are sorted into either “Maintenance” or “Community
Usage” categories. As of the latest version of the app, a 3rd category
was added to better support the analysis of “Dependencies”, all of which
can be selected via the drop down at the top of the tab:
It’s on these tabs that the bulk of the more automated review occurs
because each metric provides the context that determines the final
riskmetric score. We highly encourage users to become very
familiar with these metrics and decide which are most important to you
and your organization. As is available in riskmetric,
riskassessment allows admin users to set
organization-wide metric weights so that the risk score is based on the
most meaningful metrics, and reduces the influence of less important
metrics. Thus, if a metric is un-important to your org, we highly
recommend weighting it to 0. To learn more about these options, please
read through our “Metric
weights configuration” guide.
Maintenance Metrics
Here is a look at the Maintenance Metrics output for the “glue” package:

Each metric on this tab measures something related to package maintenance best practices, whether it be storing the code on a public URL, providing vignettes to guide users, or package authors sufficiently giving attention to bugs. Note that some of the metrics will report that an assessment is “Not Found”. That’s because this application uses the “pkg_cran_remote” source when compiling metrics, which does not have the capability to gather info for all possible metrics. There is a on-going effort to build out more more information on these remote metrics. To learn more, please explore more package assessment topics in the riskmetric documentation.
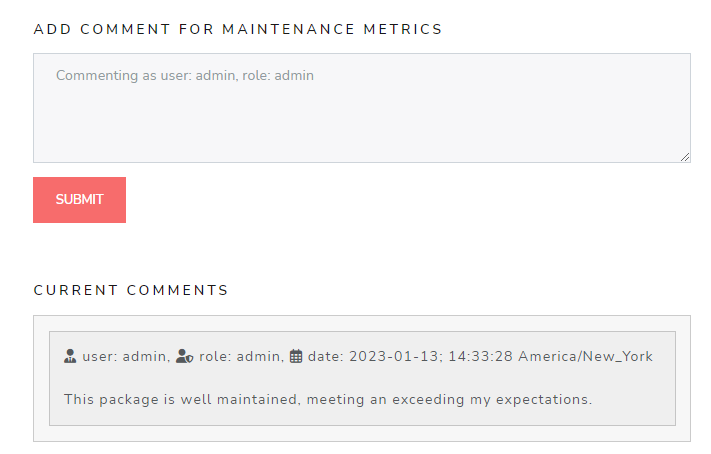
Note that you can add or replace comments to the Maintenance Metrics for this package, and review paste comments made by other users. This is a great platform to not only form your opinions, but write them down for others in your organization to read and consider during their evaluation.
Community Usage Metrics
Here is a first look at the Community Usage Metrics for the “glue” package:
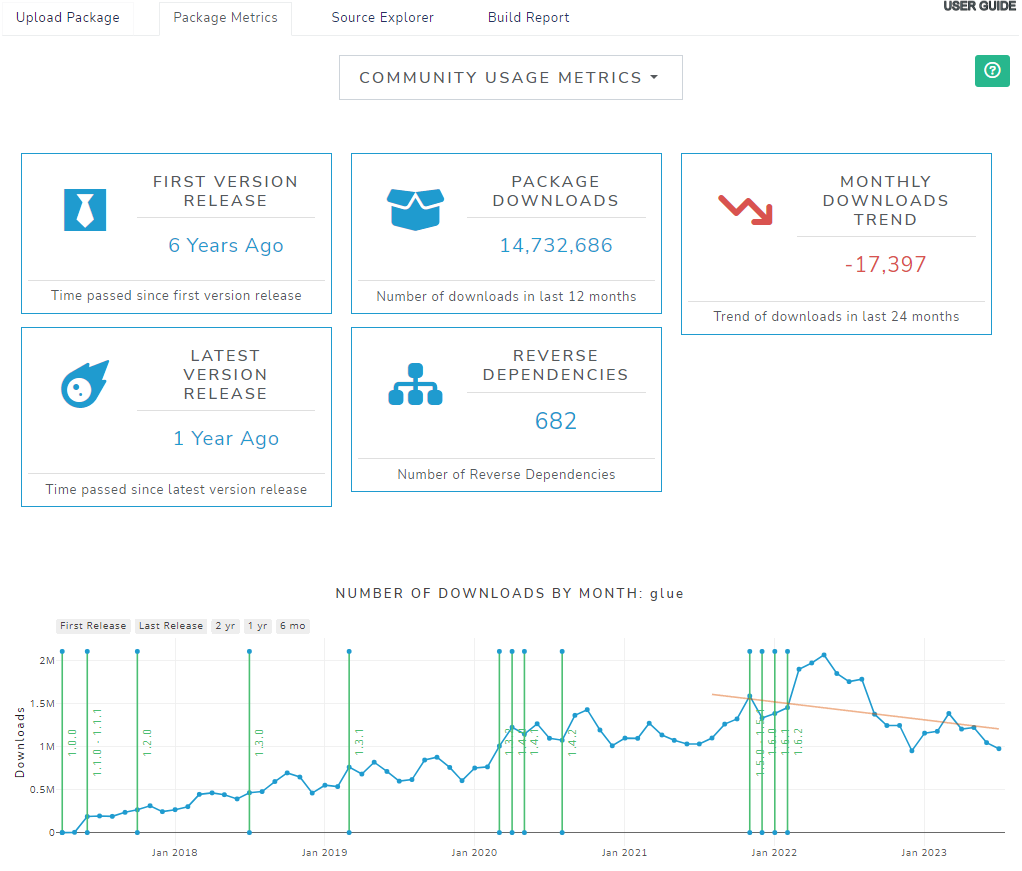
Each metric on this tab measures something related to the package’s
usage by the community. The user community plays an important role in
open source software development. In other words, the more exposure a
package has had to the community, the more ad-hoc testing it has been
exposed to. Over time the “better packages” tend to rise to the top,
leading to more downloads and increased exposure. Note that
riskmetric only considers the metric called
Number of download in the last year and
Reverse Dependencies for its risk score calculation. All
the other data presented on this tab are accessories to help the user
further explore the idea of community usage.
Notably, this tab includes a highly interactive visual, which shows the number of downloads by month since the package was first released. For more information on these metrics, explore package assessments in the riskmetric documentation.
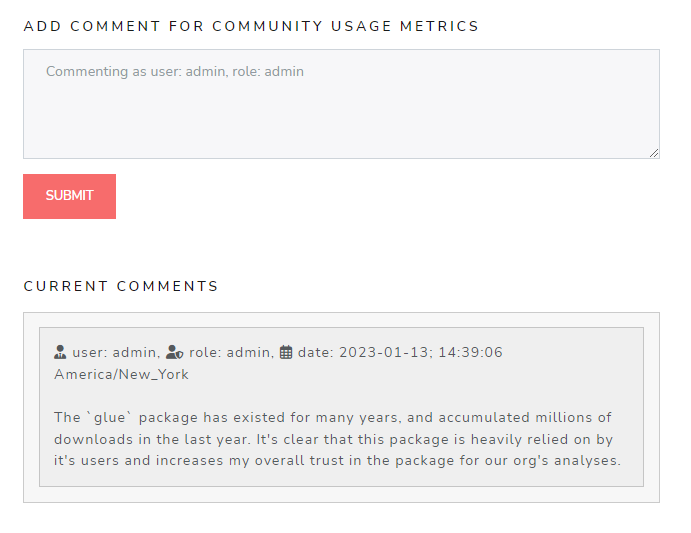
Again, you can add or replace comments to the Community Usage metrics for this package.
The ‘Source Explorer’ Tab
Introduced in v2.0.0 of riskassessment, the
Source Explorer tab offers users a more manual, hands-on
approach to assessing packages by exploring the source contents of a
package. Just as if you were a developer forking a repository to explore
code, you can now page through any of the files bundled and stored on
CRAN. There are exceptions, however: certain file types that don’t
display well in a file browser, like RDS for example, aren’t compatible.
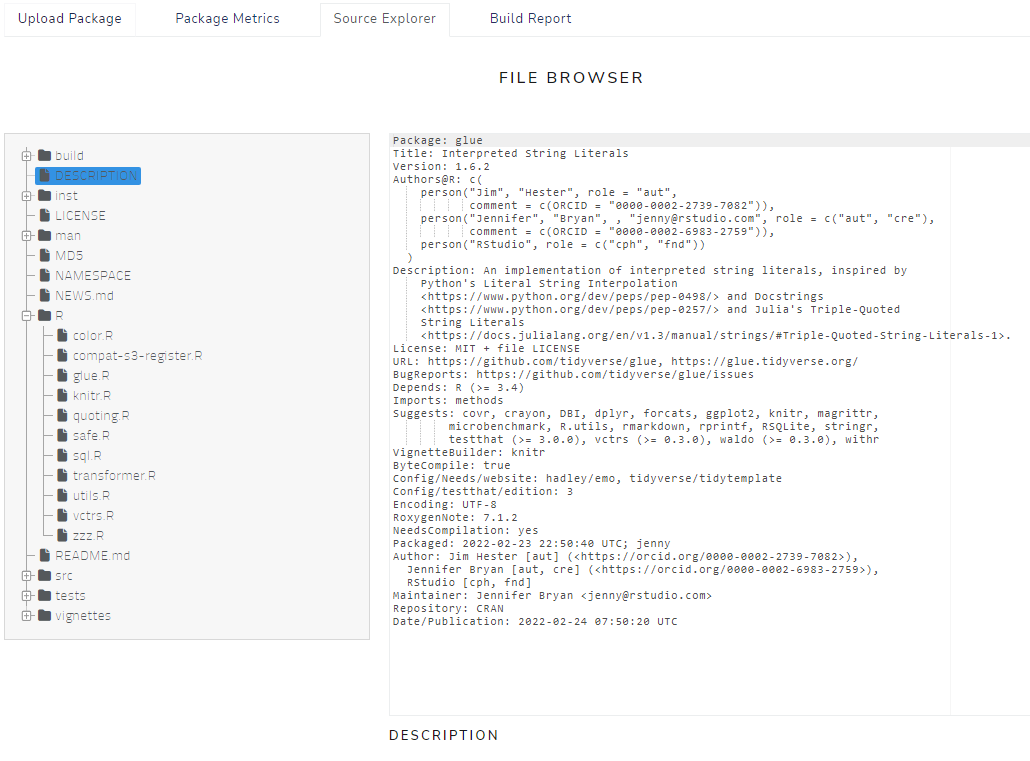
But most are; for example, we we are viewing the
DESCRIPTION file (which doesn’t have an extension) for the
glue package. The possibilities are truly endless when you
have access to the source code: can browse through R scripts containing
exported (or non-exported) functions, read contents of the
LICENSE file, or even explore the tests/
folder to inspect the robustness of a it’s unit tests. Just expand the
file tree on the left hand side to reveal the contents of those
folders.
The ‘Build Report’ Tab
Below is the top portion of the Build Report tab. This
tab pulls all the information viewed on the previous tabs and
consolidates it down into an easy to browse report, downloaded as HTML,
DOCX, or PDF. However, first it gives the user ample control over what
they care to see in each report using check boxes, which are all
pre-checked by default. Optionally, there is a “Package Summary” section
which allows reviewers to log any and all information not explicit
acknowledged by the metrics, plots, risk-based decision, or comments.
This field will allow organizations to satisfy any custom documentation
needs that that the app is not privy to. Note that only one summary can
be logged per package, so after submitted, you cannot add another, but
must edit the existing summary is acceptable.

Directly beneath these configurations is a “report preview” so you can see first-hand how your configs & review efforts impact the report before download.
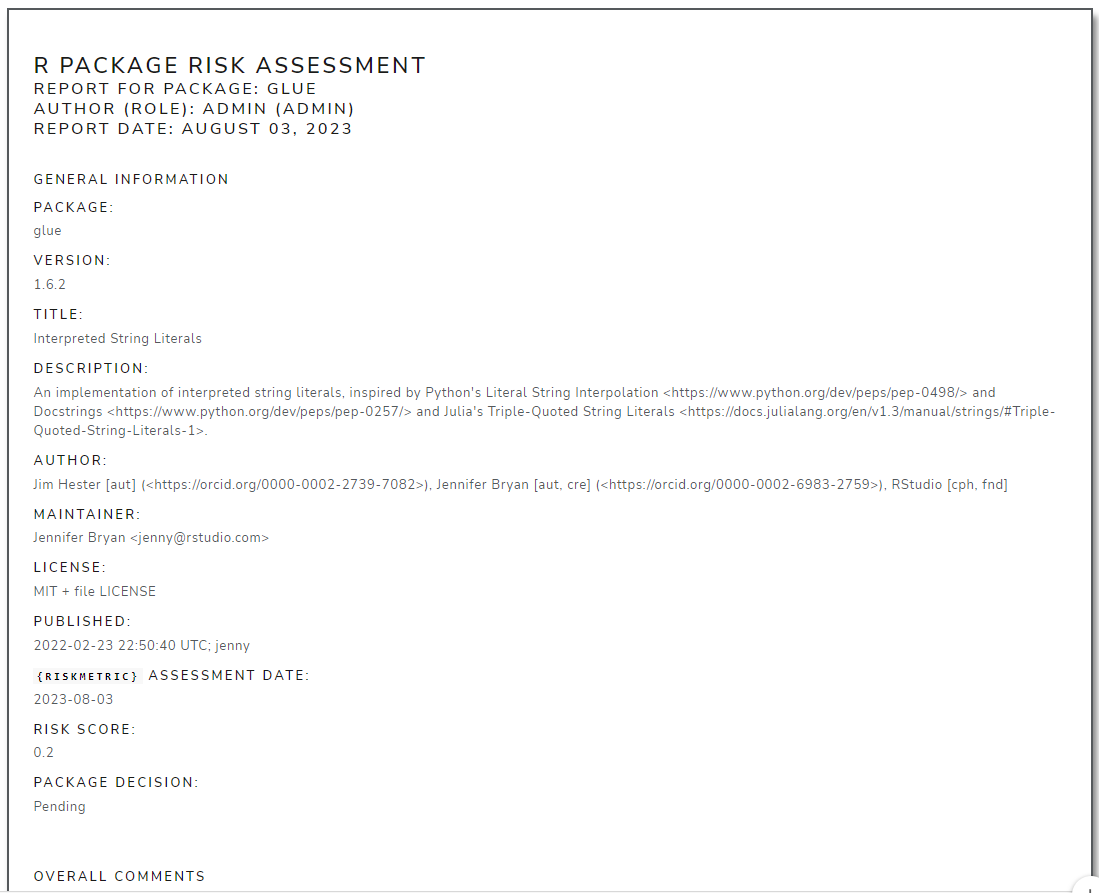
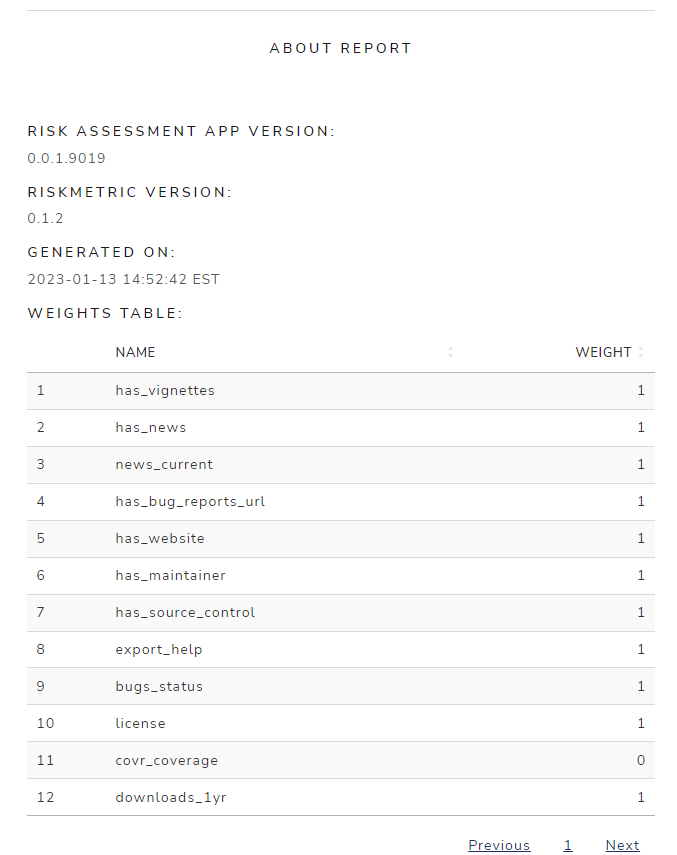
In addition to all the metric info, you can see it contains vital
metadata about the assessment performed in the app. Below is a quick
view of the metadata referenced above. It’s vital to understand the
context in which the report & score was calculated. Users are
encouraged to send these information rich reports to whom they so
choose, especially if they are not savvy with the
riskassessment app… yet.
Make a decision
So, you’ve uploaded a package, reviewed all it’s metrics, the package score, double-checked the metric weights, and even read through your co-workers comments. There’s really nothing left to do but make a final decision. So what are you waiting for! Let’s do it!
Head over to the Package Control Panel. First we’ll
start off with an “Overall Comment”. Write a few words about what you’ve
learned during your evaluation We recommend being brief and succinct
here.

After clicking submit, you’ll receive a prompt that just confirms what you wrote. Click dismiss and now turn your attention to the decision slider, with options “Low”, “Medium”, and “High”. Consider how your organization may treat each category? For example, “Low” might mean it’s permitted for use in regulatory environments, “Medium” may mean the package isn’t fully endorsed yet, so it needs to stay in a holding patter. “High” of course means rejection.
For the purposes of this guide, we submitted a decision with selection “Low” and received the following dialogue box asking us to confirm our decision:
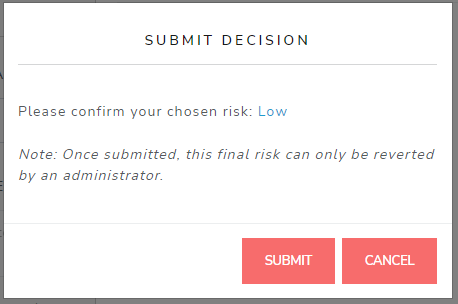
After clicking ‘Submit’, you’ll notice the STATUS was
updated to “REVIEWED” and the decision slider is now disabled &
grayed out. We are logged in as an admin user, so the
button now displays “RESET DECISION” but non-admin users will not have
that option.
Congratulations! You’ve reviewed your first package! That was your goal, you accomplished it. Now keep going, what are you waiting for? At the time this guide was authored, there was 19,038 packages on CRAN and your organization may want to use them!
Other Tabs
You may have noticed the navigation tabs at the top of the app contain the following four tabs.

All that work was performed on the first tab:
Risk Assessment. We’ll be painfully brief as we touch on
what the other tabs do, but just know there are more in-depth guides
that exist for each.
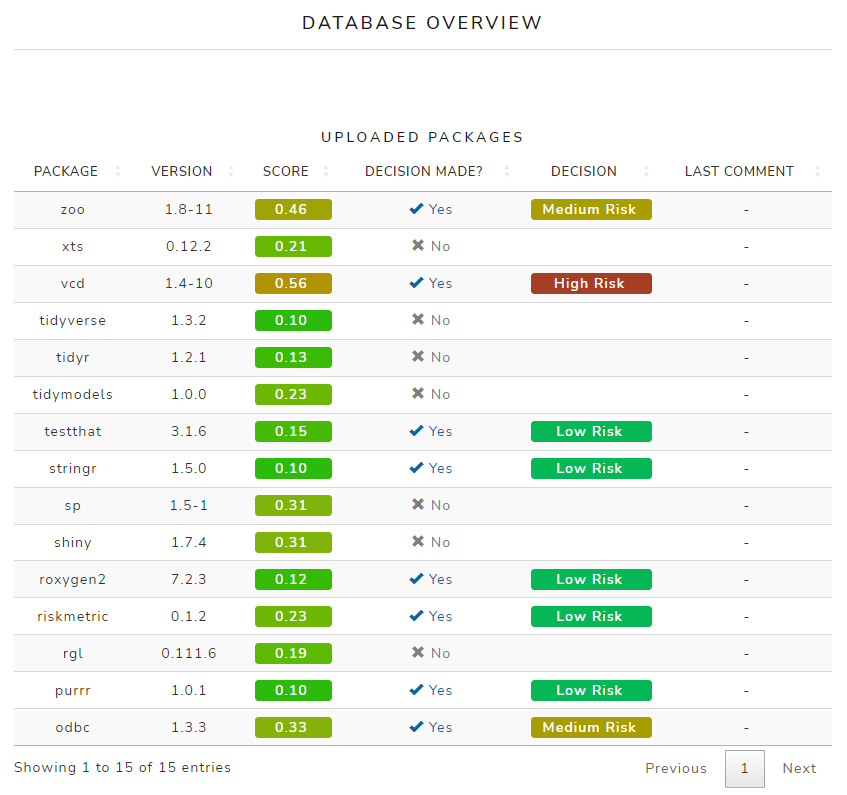
Database
The second tab, Database shows, for each package loaded,
the package name and version, it’s riskmetric score,
whether a decision has been made, the decision, and timestamp for the
last comment provided. Reports (in either .html, .docx, or .pdf format)
can be downloaded for any selected package(s). If multiple packages are
selected, this This is really helpful
Assessment Criteria
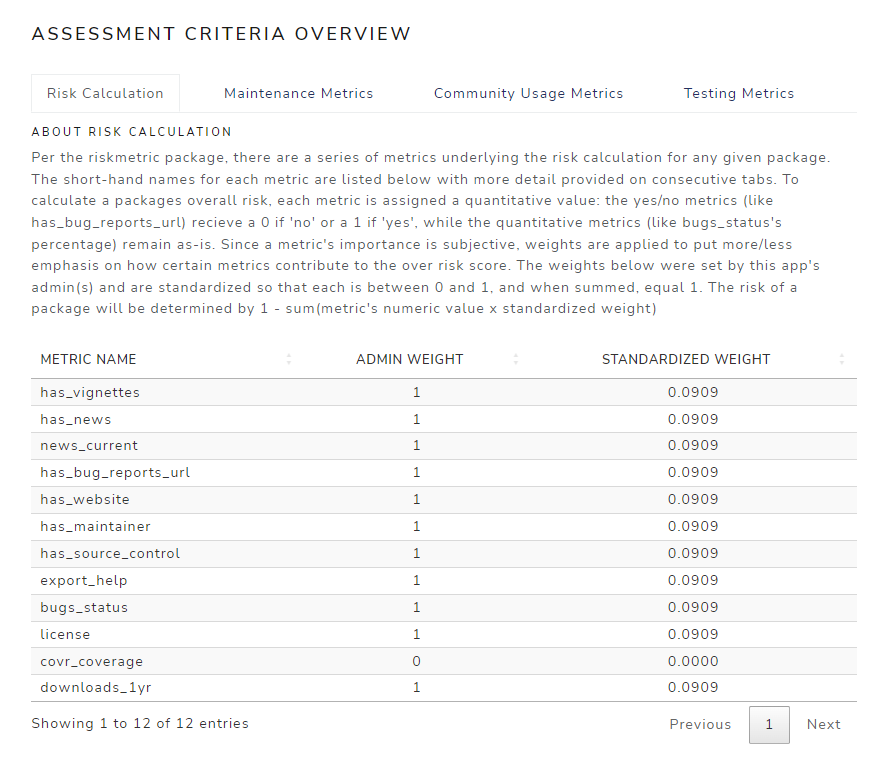
The third tab, Assessment Criteria provides a detailed
description of the assessment criteria used for Risk Calculation,
Maintenance Metrics, Community Usage Metrics, and Testing metrics. Each
metric even has a short description on why it was included in
riskmetric. The Risk Calculation tab is shown
below. Browse this tab for more information.
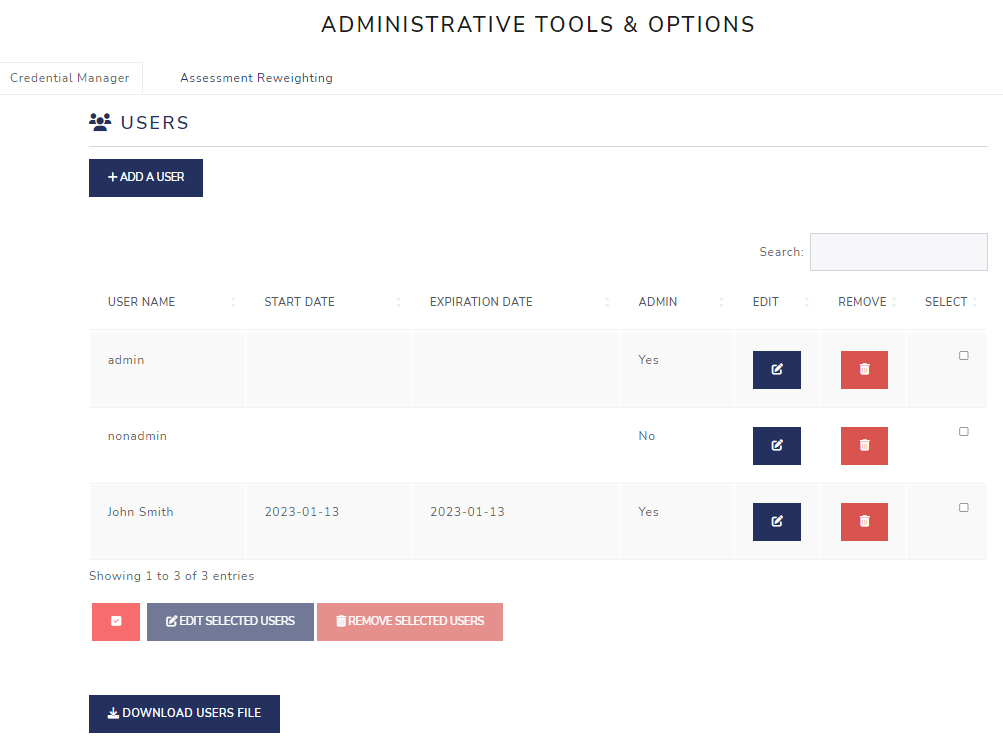
Administrative Tools
The fourth tab, Administrative tools, contains two
sub-tabs: the Credential Manager and the
Assessment Reweighting. The former allows
admin users to add or delete users as well as change
passwords for themselves or others. Further details on are provided in
the “Credential Manager”
guide
The Assessment Reweighting tab is for admin
users to fine tune the package risk score generated by
riskmetric by manipulating the value placed on each of the
metrics assessed in the app. Changes made here apply to all packages in
the database, plus all packages uploaded in the future. Further details
are provided in the “User Roles
and Privileges” guide.

Where to go from here?
Check out some of the riskmetric or
riskassessment presentations in www.pharmar.org/present/. Or
read some prepared guides to boost your knowledge and become a power
user!